Initial Setup
Build your first directory, from start to finish, in just a few minutes. You can spend more time exploring settings and configuration options once you are up and running.
It's Building Time!
You mastered the core concepts and went over the planning & organizing recommendations in detail ... You did, right? It's building time!
Instead of boring you with a laundry list of hundreds of settings, we are going to make this as practical as possible and create a working directory in just a few steps.
Fine-tuning and extending the functionality is covered in other areas of the documentation and you can study those in detail as needed.
We are building a City Guide Directory and to begin it will have categories for:
- Restaurants
- Hotels
Each category will share location fields, but will also have distinct fields. So we need a separate listing type for each business type, and a few different field groups to group those fields.
Lets get started!
Creating Categories
Create the following categories:
Hotels | Restaurants
The categories need to be created directly in Joomla or WordPress, outside of JReviews.
Creating Categories in Joomla
Use Joomla Content → Categories
Creating Categories in WordPress
Use WordPress Posts → Categories
Creating Field Groups
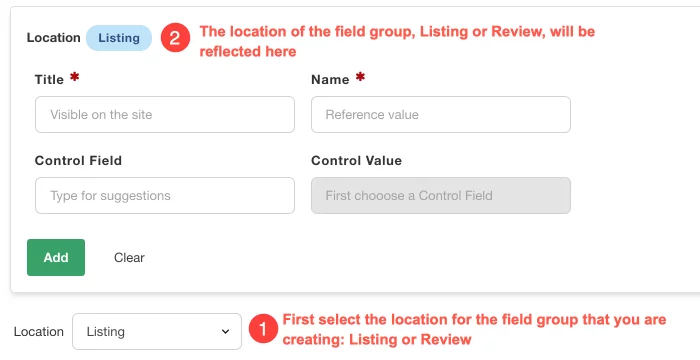
Field Groups and custom fields, can exist in listings or reviews. The default Location is listing. To create a review field group or review custom field, first change the Location to Review.
Listing Field Groups
In JReviews Setup → Field Groups Manager, create the following three listing field groups:
Address | Hotel Info | Restaurant Info

The Address and Business Info groups will contain fields that are common to Hotels and Restaurants. Then each of the other groups contains fields specific to each business type.
Review Field Groups
Now, create a Travel Details review field group for hotel reviews. Remember to first select Review from the Location dropdown.
Travel Details
Creating Custom Fields
Before creating custom fields, you need field groups to place those fields. We took care of that in the previous step. To continue, go to JReviews Setup → Custom Fields Manager.
Custom fields can be created for listings and reviews. When creating a custom field, the default location is listing. To create a review field, first change the Location, then click New.
Custom Field Basics
Creating a custom field requires at a minimum:
- Name
- Type (Text, Select, Textarea, Radiobutton, Checkbox, Date, FormBuilder, ...)
- Field Group
- Field Options for select, radiobutton and checkbox fields

Once you save a field that requires field options, use the blue + icon to create the options.

Custom Field Relations
When creating the custom fields in the next step, we are also going to establish a relation between the City and State field options. This results in city options for a specific state, only appearing after that state is selected.
To do this, we use the Control Field and Control Value settings when creating a new city field options. Below you can see that for San Franciso, we use the jr_state control field, and California for the control value.

Learn more about field relations.
Listing Custom Fields
Create the listing custom fields shown below. They are grouped together based on the field groups you created before. Create each field using the specified field title, field type and field options.
Address
| Title | Type | Field Options |
|---|---|---|
| State | Select | California, Massachusetts |
| City | Select | San Francisco (Controlled by California), Boston (Controlled by Massachusetts) |
| Street Address | Text | |
| Postal Code | Text |
Hotel Info
| Title | Type | Field Options |
|---|---|---|
| Hotel Amenities | Checkbox | Free WiFi, Room Service, Family Friendly |
Restaurant Info
| Title | Type | Field Options |
|---|---|---|
| Cuisine | Checkbox | American, Italian, French |
| Meals Served | Checkbox | Breakfast, Lunch, Dinner |
Review Custom Fields
Create the review custom fields shown below, using the field type shown next to the custom field title. Before creating a field, remember to change the Location in the Custom Fields Manager from Listing to Review.
Travel Details
| Title | Type | Field Options |
|---|---|---|
| Date | Date | |
| Visit Was For | Radiobutton | Leisure, Business |
Creating Listing Types
Next on the list, creating listing types for the two business types we are on our City Guide directory:
Hotel | Restaurant
In this particular case, we are using two different listing types, because we have different data structures and review rating criteria. Listing Types have quite a few settings, but since this is just the initial setup, we only care about:
- Title
- Field Groups
- Comments & Ratings
- Rating Criteria

Create Hotel Listing Type
Set the settings as follows for the hotel listing type.
- Title: Hotel
- Field Groups:
- Address
- Hotel Info
- Travel Details
- Comments & Ratings: Allow comments and ratings
- Rating criteria:
- Service
- Location
- Pricing
Create Restaurant Listing Type
Set the settings as follows for the hotel listing type.
- Title: Restaurant
- Field Groups:
- Address
- Restaurant Info
- Comments & Ratings: Allow comments and ratings
- Rating criteria:
- Food
- Ambiance
- Service
- Pricing
Creating Directories
In JReviews Setup → Directories Manager create the City Guide directory.
Setting Up Categories
Now's time to tell JReviews that the categories created in the first step, should be incorporated into JReviews. And at the same time, we associate those categories to the City Guide directory and the corresponding Listing Types.
Go to JReviews Setup → Categories Manager, click Setup New. First add the Hotels category and associate it with the Hotel listing type. Then do the same with the Restaurants category and the Restaurant listing type.
A Note on Categories Without Listings
When you click Setup New you will see a dialog to perform the setup. The listing type list has a default option called This category will not have listings for use in setups with sub-categories to disallow listing submissions in "placeholder" categories. For example, if you have a Movies category with subcategories for different movie genres, you can use this option for the top-level Movies category so listings cannot be created there.
Creating Menus
JReviews has many menus to choose from and many of them are required to be able to generate proper URLs for the site. Follow the instructions below to create the necessary menus.
Creating Menus in Joomla
Enable the JReviews SEF plugin to simplify the JReviews setup. The plugin re-writes the core Joomla category pages to JReviews so it can take over the page and add new functionality.
With the JReviews SEF plugin enabled, if you see URLs on your site that begin with the /jreviews segment, that is a clear sign that you are missing a JReviews menu in your setup.
Create menus in Joomla like you would normally do it under Menus. There are several menus you must create to finalize the setup:
- Joomla Articles → Category Blog • For each category setup in JReviews. This also creates nice URLs for the detail pages and ensures you can control module assignments for category and detail pages.
- JReviews → Directory • Select the
City Guidedirectory - JReviews → Submit New Listing
- JReviews → Advanced Search
- JReviews → Catch-All • Create four of these menus, and on each one you'll choose a different menu type from the
JReviewstab: Media, Listing Edit, Listing Comparison, View All Reviews for Listing
Creating Menus in WordPress
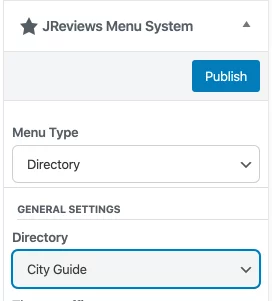
To create JReviews menus, you use WordPress pages where you'll find a JReviews Menu System in the right sidebar. Other plugins typically require shortcodes to be added in the page description. However, JReviews has a menu system where you can easily configure the type of menu and multiple settings for that menu. Add a title to the page, configure the menu and publish.

If you see URLs on your site that begin with the /jreviews segment, that is a clear sign that you are missing a JReviews menu in your setup. There are several menus you must create to finalize the setup:
- Directory • Select the
City Guidedirectory - Submit New Listing
- Advanced Search
- Catch-All • Create four of these menus: Media, Edit Listing, Listing Comparison, View All Reviews for Listing
Submitting A Listing
Time to submit your first listing! Head over to the front-end of the site and find the Submit New Listing menu.
You can toggle between the Restaurants and Hotels categories to see how the custom fields you created change depending on the listing type used by the category.
Select the category Hotels category. Fill out the listing fields and submit. You can also upload some photos. When you are done, you can click to view the listing. Then repeat the steps to create your first Hotel listing.
Adjusting Listing Permissions
The default permissions are set so that only administrators can create listings. To allow site members, or even guests, to contribute content to the site, we are going to make the first configuration change!
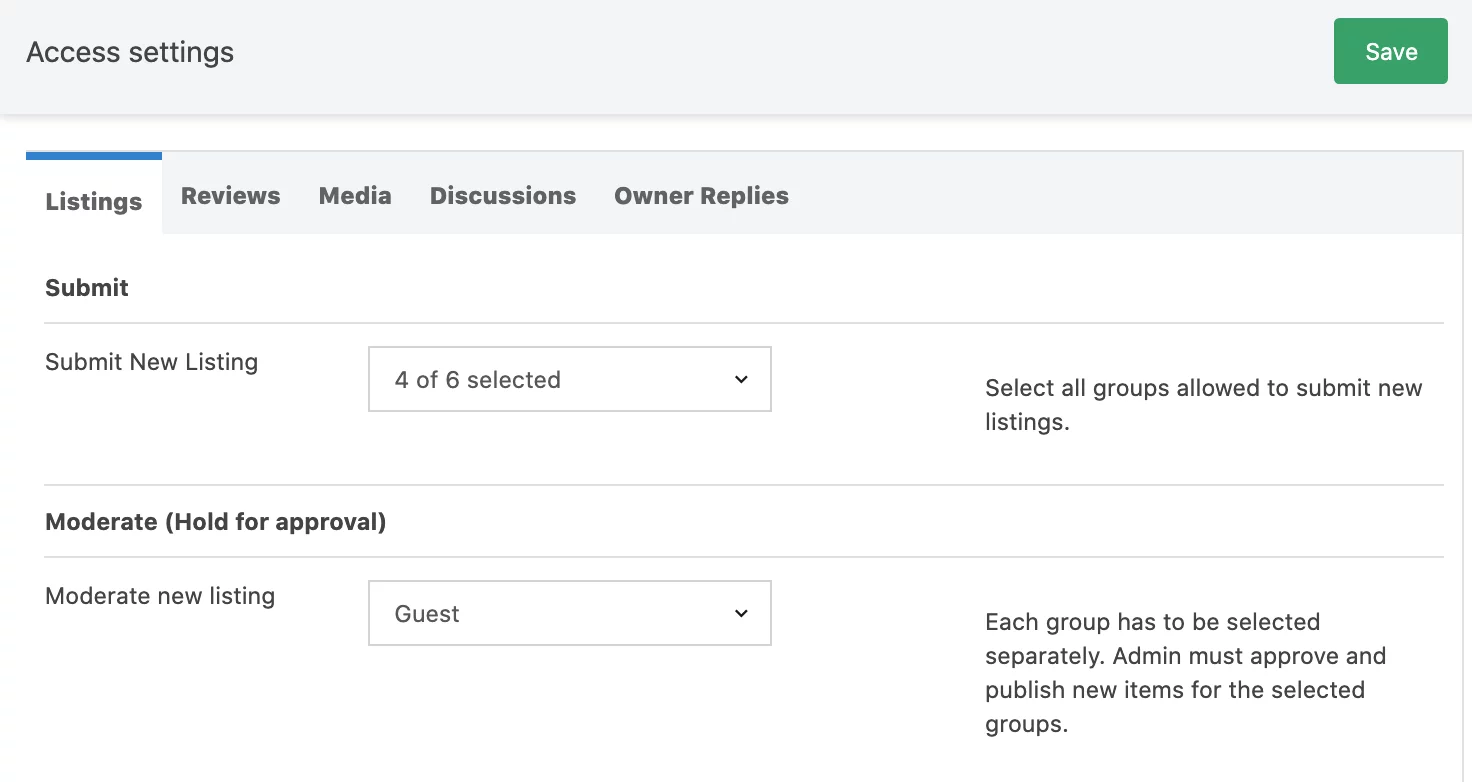
Go to Configuration → Access Settings → Listings. Find the Submit New Listing setting and select the user groups that should have permission to contribute new listings. Right below it, you can find the Moderate new listing permission, which lets you decide which user group contributions to moderate. Any listings submitted by these user groups will not be automatically published.

These Access Setttings are also available at the listing type level. This allows you to grant or block permissions for specific listing types.
Learn more about permissions & trust and explore other configuration and permission settings to fine-tune the site for your specific needs.

